구성환경
CentOS 7.6 / CentOS 8.0 / Oracle 19C(19.3.0.0.0) / RAM 4G
설치
1. 사용자 및 그룹 생성
| shell> groupadd -g 54321 oinstall shell> groupadd -g 54322 dba shell> groupadd -g 54323 oper shell> groupadd -g 54324 backupdba shell> groupadd -g 54325 dgdba shell> groupadd -g 54326 kmdba shell> groupadd -g 54327 asmdba shell> groupadd -g 54330 racdba shell> useradd -u 54321 -g oinstall -G dba,oper,backupdba,dgdba,kmdba,asmdba,racdba oracle |
2. 패키지 설치
아래의 패키지를 yum 또는 rpm 명령어로 설치
** compat-libstdc++ 패키지 외에는 centos 설치 CD 에 포함되어 있음
| bc binutils compat-libcap1 compat-libstdc++ => yum 또는 다운로드 설치(구글 검색) elfutils-libelf elfutils-libelf-devel fontconfig-devel glibc glibc-devel ksh libaio libaio-devel libXrender libXrender-devel libX11 libXau libXi libXtst libgcc libstdc++ libstdc++-devel libxcb make net-tools (for Oracle RAC and Oracle Clusterware) nfs-utils (for Oracle ACFS) python (for Oracle ACFS Remote) python-configshell (for Oracle ACFS Remote) python-rtslib (for Oracle ACFS Remote) python-six (for Oracle ACFS Remote) targetcli (for Oracle ACFS Remote) smartmontools sysstat |
3. 커널 파라메터 수정
3.1 /etc/sysctl.conf 파일 편집
| fs.file-max = 6815744 kernel.sem = 250 32000 100 128 kernel.shmmni = 4096 kernel.shmall = 1073741824 kernel..shmmax = 4398046511104 kernel.panic_on_oops = 1 net.core.rmem_default = 262144 net.core.rmem_max = 4194304 net.core.wmem_default = 262144 net.core.wmem_max = 1048576 net.ipv4.conf.all.rp_filter = 2 net.ipv4.conf.default.rp_filter = 2 fs.aio-max-nr = 1048576 net.ipv4.ip_local_port_range = 9000 65500 |
shell> sysctl -p => 커널 변경값 적용
3.2 /etc/limit.d/oracle-database-preinstall-19c.conf 생성(편집)
| # oracle-database-preinstall-19c setting for nofile soft limit is 1024 oracle soft nofile 1024 # oracle-database-preinstall-19c setting for nofile hard limit is 65536 oracle hard nofile 65536 # oracle-database-preinstall-19c setting for nproc soft limit is 16384 # refer orabug15971421 for more info. oracle soft nproc 16384 # oracle-database-preinstall-19c setting for nproc hard limit is 16384 oracle hard nproc 16384 # oracle-database-preinstall-19c setting for stack soft limit is 10240KB oracle soft stack 10240 # oracle-database-preinstall-19c setting for stack hard limit is 32768KB oracle hard stack 32768 # oracle-database-preinstall-19c setting for memlock hard limit is maximum of 128GB on x86_64 or 3GB on x86 OR 90 % of RAM oracle hard memlock 134217728 # oracle-database-preinstall-19c setting for memlock soft limit is maximum of 128GB on x86_64 or 3GB on x86 OR 90% of RAM oracle soft memlock 134217728 # oracle-database-preinstall-19c setting for data soft limit is 'unlimited' oracle soft data unlimited # oracle-database-preinstall-19c setting for data hard limit is 'unlimited' oracle hard data unlimited |
** CentOS 8 버전일 경우, 아래 명령어를 이용하여 2,3 번 항목을 자동으로 설치,설정 할수 있다.
| shell> dnf install -y https://yum.oracle.com/repo/OracleLinux/OL8/baseos/latest/x86_64/getPackage/oracle-database-preinstall-19c-1.0-1.el8.x86_64.rpm |
4. 시스템 환경변수설정, 오라클 베이스 및 인벤토리 디렉토리 생성
- .bash_profile 편집
| export ORACLE_BASE=/opt/oracle export ORACLE_HOME=/opt/oracle/product/19.3/dbhome_1 export ORACLE_SID=ORCL export PATH=$ORACLE_HOME/bin:$PATH |
- ORACLE_HOME 및 인벤토리 디렉토리 생성
| shell> mkdir -p /opt/oracle/product/19.3/dbhome_1 => 소프트웨어 디렉토리 생성(ORACLE_HOME) shell> mkdir -p /opt/oraInventory => 인벤토리 디렉토리 생성(설치 로그 저장 디렉토리) shell> mv mv LINUX.X64_193000_db_home.zip /opt/oracle/product/19.3/dbhome_1 => 오라클 패키지를 ORACLE_HOME으로 이동 또는 복사 shell> unzip LINUX.X64_193000_db_home.zip => 오라클 패키지 압축 해제 shell> source ~/.bash_profile => 환경 변수 적용 |
5. 유니버셜 인스톨러 실행
| shell> cd $ORACLE_HOME shell> ./runInstaller |
** CentOS 8에서 설치할 경우 아래 명령어를 실행후 runInstaller 실행
shell> export CV_ASSUME_DISTID=RHEL7.6
5.1 데이타베이스 설치 옵션 선택

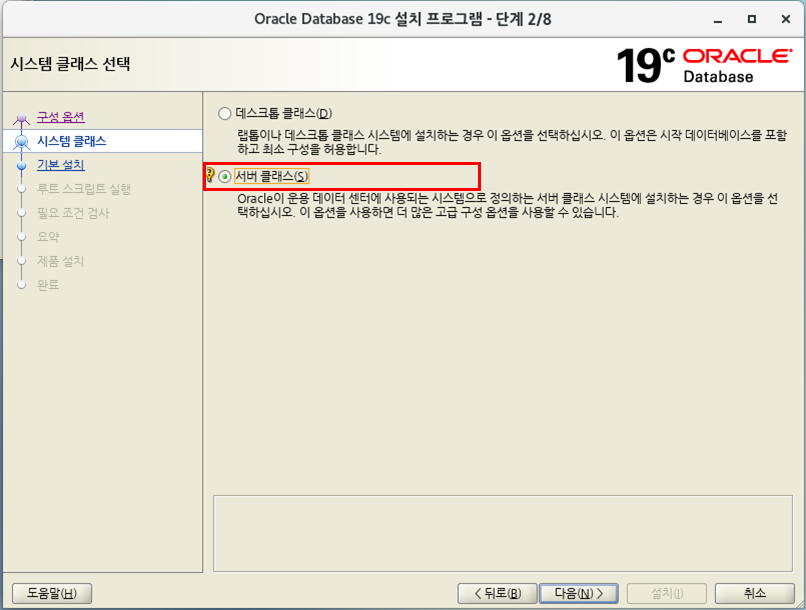
5.2 시스템 클래스 선택
5.3 데이터베이스 버전 선택

5.4 ORACLE BASE 위치 선택

5.5 인벤토리 지정 (오라클 설치 로그 파일 저장등등)

5.6 데이터베이스 유형 선택

5.7 데이터베이스 식별자 지정 및 컨테이너 데이터베이스로 생성

5.8 메모리 및 문자집합 선택

* 메모리 설정중 아래와 같은 메시지가 나오는 경우는 커널의 shmmax 설정값 보다 SGA 값이 클 경우 발생, 운영환경이 아닌 개인용도로 사용할 경우 무시하고 진행한다.


5.9 데이터베이스 저장영역 선택

5.10 관리 옵션 선택

5.11 복구 옵션 선택
- flashback database, archive log, 데이터베이스 백업 파일 위치

5.12 스키마 비밀번호 설정
- 계정마다 다른 비밀번호를 사용할지, 아니면 모든 계정에 동일한 비밀번호 사용할지 선택

5.13 권한이 부여된 운영체제 그룹 선택

5.14 루트 스크립트 실행 옵션 선택

5.15 필요 조건 검사 수행
- 오라클은 설치시 shmmax를 시스템 메모리의 1/2 이상의 크기를 요구하는데. 무시하고 다음 진행

5.16 설치 요약

5.17 제품 설치

5.18 스크립트 실행 여부가 나오면 [예] 클릭하여 계속 설치 진행

5.19 설치 완료

5.20 sqlplus로 데이타베이스 접속
| shell> sqlplus / as sysdba SQL*Plus: Release 19.0.0.0.0 - Production on 금 12월 20 00:20:37 2019 Version 19.3.0.0.0 Copyright (c) 1982, 2019, Oracle. All rights reserved. 다음에 접속됨: Oracle Database 19c Enterprise Edition Release 19.0.0.0.0 - Production Version 19.3.0.0.0 SQL> select NAME,CDB from v$database ; NAME CDB --------- --- ORCL YES SQL> |
6. Trouble 슈팅
CentOS 8버전에서 설치시 아래와 같은 오류가 발생할 경우, 아래 명령어 실행
export CV_ASSUME_DISTID=RHEL7.6
| [INS-08101] Unexpected error while executing the action at stat: 'supportedOSCheck' |

'DBMS > ORACLE' 카테고리의 다른 글
| ORACLE 19C Silent Mode 설치 (2) | 2019.12.21 |
|---|---|
| ORACLE 19C 완전 삭제 (0) | 2019.12.20 |
| FLASHBACK TABLE (0) | 2019.12.18 |
| Fast Recovery Area 이란 (0) | 2019.12.16 |
| Flashback Database (0) | 2019.12.16 |
